What is this about?
In the first part of this tutorial series, we talked about all the goodness of serverless and how we can create a serverless architecture of AWS Lamba functions with a static IP using a NAT Gateway and Elastic IP.
Since you’ve diligently gone through it, you’ve now leveled up to the next step. Congratulations! Let’s now figure out the deployment of the same, using GitHub actions in a CD pipeline.
In this second part, we will:
- Create a CD pipeline in GitHub that will run on code push to a particular branch.
- This pipeline will deploy the serverless templates (CloudFormation templates) to create your lambda functions.
- We will verify everything that we did up until this point.
You have been following along with the starter shared in the first part, but if you want a link to that again. Here you go!
Let’s begin!
Deployment Instructions
Step 1 - Update the scripts
Almost there to run this thing! Woohoo. Let's add a couple of scripts to the package.json to run this locally, build it and deploy it.
That's all the steps to set up our code. The good thing about serverless is that deployment to the service provider (AWS here) is easy peasy!
We will add it as a GitHub action too. Here are some points to remember
- The repo contains the two workflow files as part of the initial setup.
- The CI is your basic lint, test, build setup.
- The CD is built and will deploy to AWS.
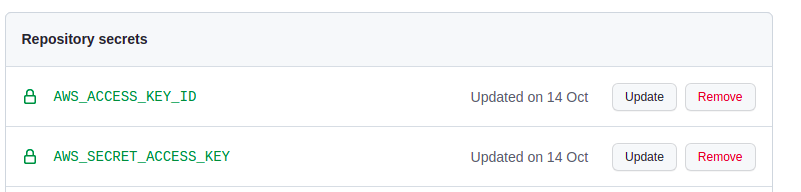
- For deploying to AWS, make sure you add two GitHub secrets related to your IAM user creds.
Step 2 - Add the CD pipeline
We will run the CD pipeline using GitHub actions. We will use a couple of actions for this purpose. Let’s create a cd.yml in the GitHub workflows folder.
Add the following lines to the yml
This workflow does a couple of things. It runs the action on every push to a branch called dev. Feel free to update that to your liking. Then, it starts the job and goes through the steps:
- Set’s up the node environment,
- installs the dependencies, and finally
- deploys the changes using the GitHub secrets you added.
Step 3 - Running the pipeline and verifying.
You’ve reached here! Great! The next thing we would do is push all the changes to GitHub, if you are pushing directly to a branch called dev the CD pipeline will run automatically. This may take a couple of minutes. Feel free to catch up on the sitcom episode you are currently watching during this or get a snack 😛
Once the pipeline runs, it will deploy your Cloud Formation templates. You can now go to the AWS console and verify the resources created for each of them. Searching for them in the main search bar and checking the tags you added is the best way to make sure they are yours and part of the deployment.
To test this all out, I recommend requesting to hit the HTTP endpoint exposed by the lambda function

You can find the Lambda API Gateway HTTP endpoint in the configuration tab of the Lambda you just created and deployed.
You can hit the lambda endpoint from the API testing client like postman/hopscotch and view the response details.
You can see the NAT Gateway instance that you created with an elastic IP attached in the VPC section of the AWS console.
That feels good. This is the IP that you can use for the whitelisting process.
.png)
Remember, the Lambda function we wrote in the first part does a very simple response of returning the IP of the requester. We can make the same as a simple check. We can also check that the
- Lambda and all our other resources are in the same vpc.
- The Lambda will be in a private subnet. The same subnet will be associated with to route table which will have the rule to allow traffic to your NAT Gateway.
- The NAT Gateway will be in a public subnet and the public sub vnet will have a routing table associated with a route that directs all traffic to the IGW that we created.
We can also call the Lambda API and see the IP returned by the function.
That’s it for me. This has been long. Hopefully, you have learned something new. Please do join the conversation on Twitter and share your learnings.
A piece of advice before we part. Always keep an eye on the AWS costs. NAT Gateways are not cheap.
Where to go from here?
If at any point you feel somewhat stuck or unsure, the finished code for this Wednesday setup is available here.
The next steps would involve venturing further into the serverless route. I would suggest you take a look into an excellent resource Wednesday has been maintaining here.
Craving more after this read? LeadReads is where top C Execs turn for more exclusive insights and stories about digital products. Don’t be left out!
Join here.
About the Author
Vishnu Prasad is a Software Engineer at Wednesday Solution. If not thinking about creating great experiences on the web he is probably re-watching episodes of the Office or listening to 90's Malayalam Music