Serverless architecture offers developers a variety of advantagesthat prove attractive in the development of large, scalable applications. Let's go over 3 top benefits:
- It offers the ability to write code and deploy to the cloud without worrying about the infrastructure.
- It enhances the economic sense of paying for what you use or execution-only billing.
- The ability to write an application in a language/framework of your choosing with a fast turnaround to production-ready setup.
Integration of third-party services is an inevitable part of the development lifecycle. If you do work with security-conscious third-party services then a common requirement that arises is whitelisting of an IP to avail these services.
In this two-part tutorial series, we will walk through the creation of an AWS lambda function with some additional AWS resources that will allow you to provide third-party services with a static IP for whitelisted communication.
Let’s begin with Part 1 of this tutorial where you will:
- Use the serverless framework with webpack to create a serverless application and all the necessary AWS resources that go with it.
- Integrate a NAT Gateway with Elastic IP for static IP.
In the next part (i.e. Part 2 ) of this series, you will,
- Use GitHub Actions as a CD pipeline to verify and deploy to AWS.
The Architecture
This tutorial assumes you have an expert level understanding of the following AWS services:
We will also be using the serverless framework to create, setup, test locally and deploy the application. The serverless framework is a great tool to get started with serverless architecture and systems.
Please visit the link https://www.serverless.com/framework/docs to learn more.
Our setup will look like this:
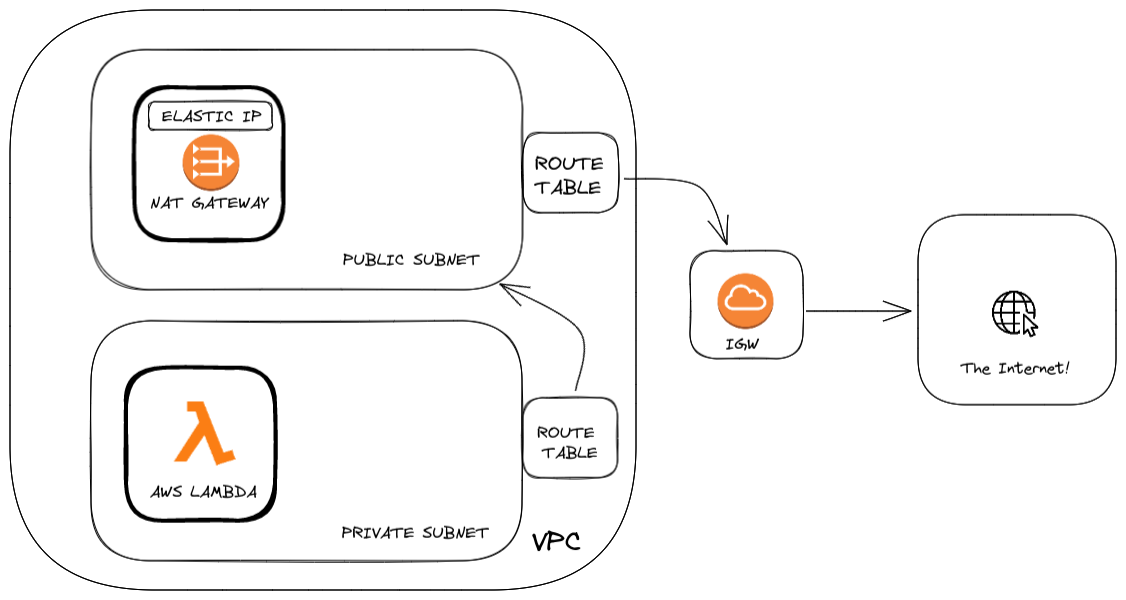
In this tutorial, we will help you get through the deployment of a Lambda function with the proper connections to have an elastic IP associated.
Let's start building
Starter Project
Just a quick intro to what all we have. The most important part of the setup is the serverless.yml file. In it you will find:
1. Service name: Currently, it reads from the env file. Feel free to use one of your choosing.
2. Plugins:
- serverless-webpack plugin for bundling the functions, the dependencies, and more. Check out the webpack config here.
- serverless-offline plugin for testing locally.
We’ll break this part of the tutorial into two sections
- Create the AWS resources
- Addition of Lambda functions
Creating the AWS Resources
Step 1 - Update the serverless file
Add the following lines below the last lines of the serverless.yml file:
Here we are pointing to the functions (lambdas) and the resources (AWS infrastructure) that we will need to setup all this. We will add these files along the way. Exciting much?
Step 2 - Adding the VPC
Let's add the resources.
- First, create a vpc.yml file in the resources folder. This is where you will create an AWS vpc resource.
- Copy and paste the following code into the vpc.yml.
- Don’t forget to check the indentation and change the names, tags as you want.
Resources:
Pretty basic stuff, right? We have a resource type and a CIDR block (a range of IP addresses).
We will need to come back to this file in a bit. Let's move on.
Step 3 - Adding the Elastic IP and Internet Gateway
We will create two files called internet-gateway.yml and elastic-ip.yml in the resources folder.
Add the below resources to the files as mentioned in the elastic-ip.yml
Now let's create the internet-gateway.yml file.
We created two more resources. An Internet Gateway that allows us to connect to the outside internet from AWS VPC and an Elastic IP is the pubic static IP that will be given to third parties as our service IP address. The domain is a field that indicates whether the Elastic IP address is for use with instances in a VPC (which it is!).
At this point your folder structure will look like this:

Step 4 - Adding a NAT Gateway Resource and Subnets
Create a nat-gateway.yml file in the resources. Add the following resources.
The NAT gateway is the star of the show.
NAT is a service that allows instances inside your vpc to connect to outside resources or systems but external connections to internal vpc systems are prohibited. AllocationId is a function that gets the AllocationId of the Elastic IP resource we created.
The Nat has a public subnet that it connects to. Look at the figure for the architecture.
The other resources are subnets. A private one that connects to resources in the vpc. A public one that will reroute and connect to Internet Gateway. Read more about the subnet here.
Step 5 - Route Tables
We will have two route tables as part of this setup.
One for the private subnet and another for the public subnet. Create two files route-private.yml and route-public.yml and add the following resources correctly. Let's work on the route-private first
Now the route public file and resources
A route table is a set of rules that establishes where network traffic is directed. It's can be associated with a subnet. It has a destination and target gateway. For the private route table, we add a route table rule that routes all traffic through the NAT Gateway. We also create an association between the route table and our private subnet.

This is how a route table looks after creation. Don't worry we will reach there.
The public route table also follows mostly the same pattern. The only difference is that its association is with the IG we created in Step 2.
Step 6 - VPC Gateway attachment
Now let's get back to the vpc resource down the line. It's that time. Go back to the vpc.yml file and add the following lines
This attaches the Internet Gateway to the vpc enabling communication with the internet through the vpc.
Remember this is a new resource within the vpc file. I know some people don’t like code pictures, but I wanted to try carbon. So vpc.yml will look like this:
.png)
Step 7 - Adding an IAM resource
We are adding an IAM role that will allow us to access the lambda and the associated lambda logs in CloudWatch. Now that we have all the resources. All the file structures should look like this.
.png)
Step - 8: Add a security group
We will add a security group for our architecture setup.
We add a security group and add it to the VPC we created using the VpcId key in the template. This is important to control traffic to and from the subnets. By default, it has a set of rules associated with the traffic that flows through the group.
Before you move on, here’s a tip top C Execs already know: LeadReads is your source for exclusive digital product insights and stories. Don’t miss out!
Join here.
Adding the functions
Step 1: Add a function resource
We will add a function or a lambda in this step. Create a file called functions.yml in the resources folders and add the following code to it. This just points to a function that we will add, nothing fancy.
We have the name of the function and the handler it points to.
Step 2 Add the function
Inside the functions folder, create a folder called tutorial-function and an index.js. Add the following function to the handler
This function is very basic with the idea being to just hit an outside service that returns the IP of the server from which the request was made. This will help us see that we have assigned a NAT Gateway Elastic IP to the lambda.
Step 3 - Attaching the resources to the function
This is where it all comes together. We have created a lot of resources, we need to piece it all together so that the lambda we created has these resources attached. We do that in the serverless.yml file.
We should add the lines starting from the vpc to the file. Make sure you get the indent correct. We are attaching our Lambda functions with the vpc, security group, and the private subnet. Remember the Lambda rests in the private subnet.
Step 4 - Testing this locally
Now as part of this set up, we do have a very interesting way to test our functions locally. We have added a plugin called serverless-offline to get this started up locally rather easily.
To get started, go to your working directory with your setup and run the following command.
This should start up a server using a webpack, that exposes the following API’s.
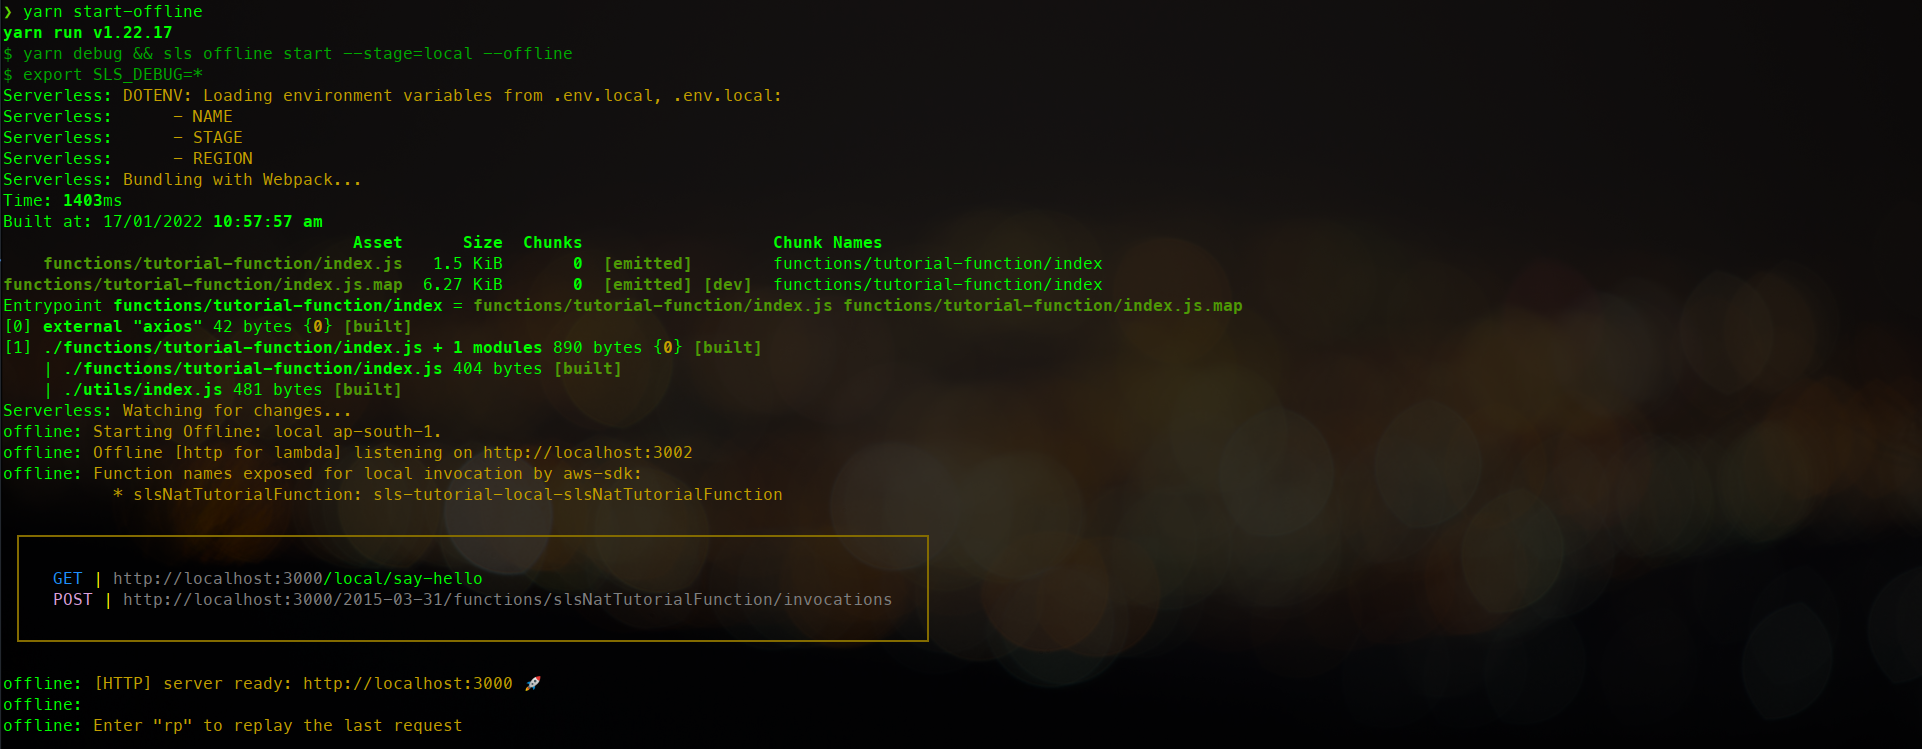
You can see a GET method exposed by the server. To verify the API’s you could now just go to an API testing resource like postman and try to hit this endpoint.
The result should be something like this.

Nice right? Now let’s get this deployed to AWS so that the whole world can say hello to your AP That was bad. Onwards we go. 🚀
Where to go from here?
This got a bit long, didn’t it ? If at any point you get stuck or want to refer to the resources, please feel free to refer to the finished setup available here
We have certainly made great strides in creating all these resources and linking all of them. If you reached all the way to the end here, great job!
Let’s wrap this up and deploy all the resources we created using GitHub Actions in Part 2 of this tutorial series. Will see you there!
We hope you enjoyed reading this article as much as we enjoyed piecing it together! While we work on Part 2, please feel free to join the conversation over on our Twitter.
About the Author
Vishnu Prasad is a Software Engineer at Wednesday Solution. If not thinking about creating great experiences on the web he is probably re-watching episodes of the Office or listening to 90's Malayalam Music