We’re here to work with you at all stages.

View all services
Build products using the latest engineering practices and designs that aren’t just functional but beautiful with Launch.
Learn more
Rethink how your product delivery teams build and design your products. Architect to build the building blocks that allow experimentation with Amplify.
Learn more
Gain market share by designing and building product features. Gain velocity by embedding our experts in your team with Catalyse.
Learn more
Take control of your cloud costs and technical debt, and add coverage for DevOps with Control.
Learn more

Articles

From user research, digital strategy to solving bold engineering problems. Our team specialises in providing a suite of services that take an idea from a rough sketch to an enterprise grade product.
View all articles

Tutorials

Learning new technologies and frameworks ensures we are ahead of the curve. Here is a collection of step by step tutorials about things we've learnt. Learn with us!
View all tutorials

Products

We love open source, and we love giving back. Take a look at our open source products and how we're pushing the bounds of Engineering excellence one product at a time
View all products

Culture

We believe the best digital products are built by a diverse and skilled team. We’ve created a safe inclusive workspace, and we believe in diversity. We are a group that believes in software development and design is a craft. This is what unites us.
Learn more

Mission, Vision & Purpose

Our team is diverse. Each coming from a different background and beliefs. We think of product development & design as a craft. We love to learn new ways of improving our craft - be it learning new frameworks, or adding new specialties.
Learn more

White Papers

We believe the best digital products are built by a diverse and skilled team. We’ve created a safe inclusive workspace, and we believe in diversity. We are a group that believes in software development and design is a craft. This is what unites us.
Learn more

Wednesday Wisdom

Our team is diverse. Each coming from a different background and beliefs. We think of product development & design as a craft. We love to learn new ways of improving our craft - be it learning new frameworks, or adding new specialties.
Learn more
View all tutorials
[Part 1] Executing batch jobs in a multi-container environment using NodeJS and express.
July 30, 2021
Mohammed Ali Chherawalla
Software Engineer
Contents

High internet adoption and penetration have made it necessary for backend applications to be built for scale. Scaling the infrastructure up/down dynamically based on traffic ensures that tech acts as an enabler for the business rather than a barrier. Scaling down in times of low load makes sure that we aren’t wasting dollars in idle cycles. Growth should not be limited by tech.

Most complex applications will require you to write a batch / CRON job at some point in time.

When working with containerized applications and batch jobs you need to take care of the following:

  • A job should be executed by only one container. If you have a batch job that is scheduled to run at 12 am every day, only one of the deployed containers should run it. Else it could lead to duplication, and/or unintended consequences. For example, a payments company has a batch job to send out payment reminders to customers whose bill is due. If each container runs the job, the user will be spammed with messages.
  • The job status and queue shouldn’t be tied to containers. By design, the orchestrater will spawn or kill containers based on the current load. Decoupling job queuing and status from the container allows the batch jobs to be agnostic of the container that will execute it.

To fulfill the above requirements, we will hold the job queue and statuses of the jobs in Redis. The container will get the queue from Redis and will query it to get the status of the job. It will not execute the job if it is already being processed.

This tutorial assumes that you have a good understanding of

In this 3-part series, you will

  • Create an endpoint that schedules a job (Part 1)
  • Setup batch jobs to be executed at midnight (Part 2)
  • Setup GraphQL subscriptions with Redis support (Part 3)

Starter Project

Please clone the following repository: https://github.com/wednesday-solutions/node-express-batch-jobs-starter. It contains a fully functional GraphQL Node express server.

Note: If you’re not familiar with GraphQL please take a few minutes to read the spec “here.

Setup Redis locally

In this step, we will install and set up Redis locally and make sure that our application can connect to it.

We will be creating queues based on Redis using Bull (https://optimalbits.github.io/bull/) to:

  • process scheduled jobs
  • process a midnight CRON
  • publish an automated notification every minute
Step 1

Install Redis locally. If you’re using a mac you can use home brew to install it


brew update
brew install redis

Start Redis using the command below


brew services start redis

To install and set up Redis for Windows/Linux systems please take a look at the relevant links

Step 2

Install bull and string-replace-loader


yarn add bull string-replace-loader

Add this rule to the webpack.server.config.js. Without this bull is not able to find the required .lua files.


module.exports = (options = {}) => ({
  mode: options.mode,
  entry: options.entry,
  optimization: options.optimization,
  ...,
  externals: {
    bull: 'commonjs2 bull'
  },
  ...,
  module: {
    rules: [
      ...,
      {
        test: /node_modules\/bull\/lib\/commands\/index\.js$/,
        use: {
          loader: 'string-replace-loader',
          options: {
            search: '__dirname',
            replace: `"${path.dirname(require.resolve('bull'))}/lib/commands"`
          }
        }
      },
      ...,

Step 3

Add the following values in the .env. a local file


REDIS_DOMAIN=localhost
REDIS_PORT=6379

Step 4

Create the server/utils/queue.js file


touch server/utils/queue.js

Add the code below to it


import Bull from 'bull';
import moment from 'moment';
const queues = {};
// 1
export const QUEUE_NAMES = {
  SCHEDULE_JOB: 'scheduleJob'
};
// 2
export const QUEUE_PROCESSORS = {
  [QUEUE_NAMES.SCHEDULE_JOB]: (job, done) => {
    console.log(`${moment()}::Job with id: ${job.id} is being executed.\n`, {
      message: job.data.message
    });
    done();
  }
};
// 3
export const initQueues = () => {
  console.log('init queues');
  Object.keys(QUEUE_PROCESSORS).forEach(queueName => {
      // 4
      queues[queueName] = getQueue(queueName);
      // 5
      queues[queueName].process(QUEUE_PROCESSORS[queueName]);
  });
};
export const getQueue = queueName => {
  if (!queues[queueName]) {
    queues[queueName] = new Bull(queueName, `redis://${process.env.REDIS_DOMAIN}:${process.env.REDIS_PORT}`);
    console.log('created queue: ', queueName, `redis://${process.env.REDIS_DOMAIN}:${process.env.REDIS_PORT}`);
  }
  return queues[queueName];
};

  1. Create a constant for queue names.
  2. Associate the processors with the queues.
  3. Initialize all the queues in the initQueues method. Iterate over all the keys in queue processors.
  4. getQueue will create a queue with queueName if it's not already present and return it.
  5. queues[queueName].process(QUEUE_PROCESSORS[queueName]); will attach the functions in the QUEUE_PROCESSORS to process jobs from the appropriate queue.
Step 5

To initialize your queues

  • import initQueues in the server/index.js file

import { initQueues } from '@utils/queue';

  • invoke initQueues like so

...
export const init = () => {
  ...
  if (!isTestEnv()) {
    app.listen(9000);
    initQueues();
  }
  ...
}

  • setup the database and run the app using ./setup-local.sh
  • If the db is already setup and you just need to run the application use yarn start: local

You should see the above logs in your console.

Commit your code using the following git commands


git add .
git commit -m 'Local redis setup done'

Write mutation for job scheduling

In this step, we will expose a mutation called scheduleJob.

Step 1

Create a new file for the job scheduler


mkdir -p server/gql/custom
touch server/gql/custom/scheduleJobMutation.js

Step 2

Copy the snippet below in the newly created file.


import { GraphQLNonNull, GraphQLObjectType, GraphQLString, GraphQLInt, GraphQLBoolean } from 'graphql';
export const scheduleJob = {
  type: new GraphQLObjectType({
    name: 'ScheduleJob',
    fields: () => ({
      success: {
        type: GraphQLNonNull(GraphQLBoolean),
        description: 'Returns true if the job was scheduled successfully'
      }
    })
  }),
  args: {
    scheduleIn: {
      type: GraphQLNonNull(GraphQLInt),
      description: 'Milliseconds from now that the job should be scheduled'
    },
    message: {
      type: GraphQLNonNull(GraphQLString),
      description: 'Message that should be consoled in the scheduled job'
    }
  },
  async resolve(source, args, context, info) {
    // since currently there is no logic to schedule the job
    // this will always return false
    return { success: false };
  },
  description: 'Schedule a job that will be executed in ${scheduleIn} milliseconds. This job will console ${message}.'
};

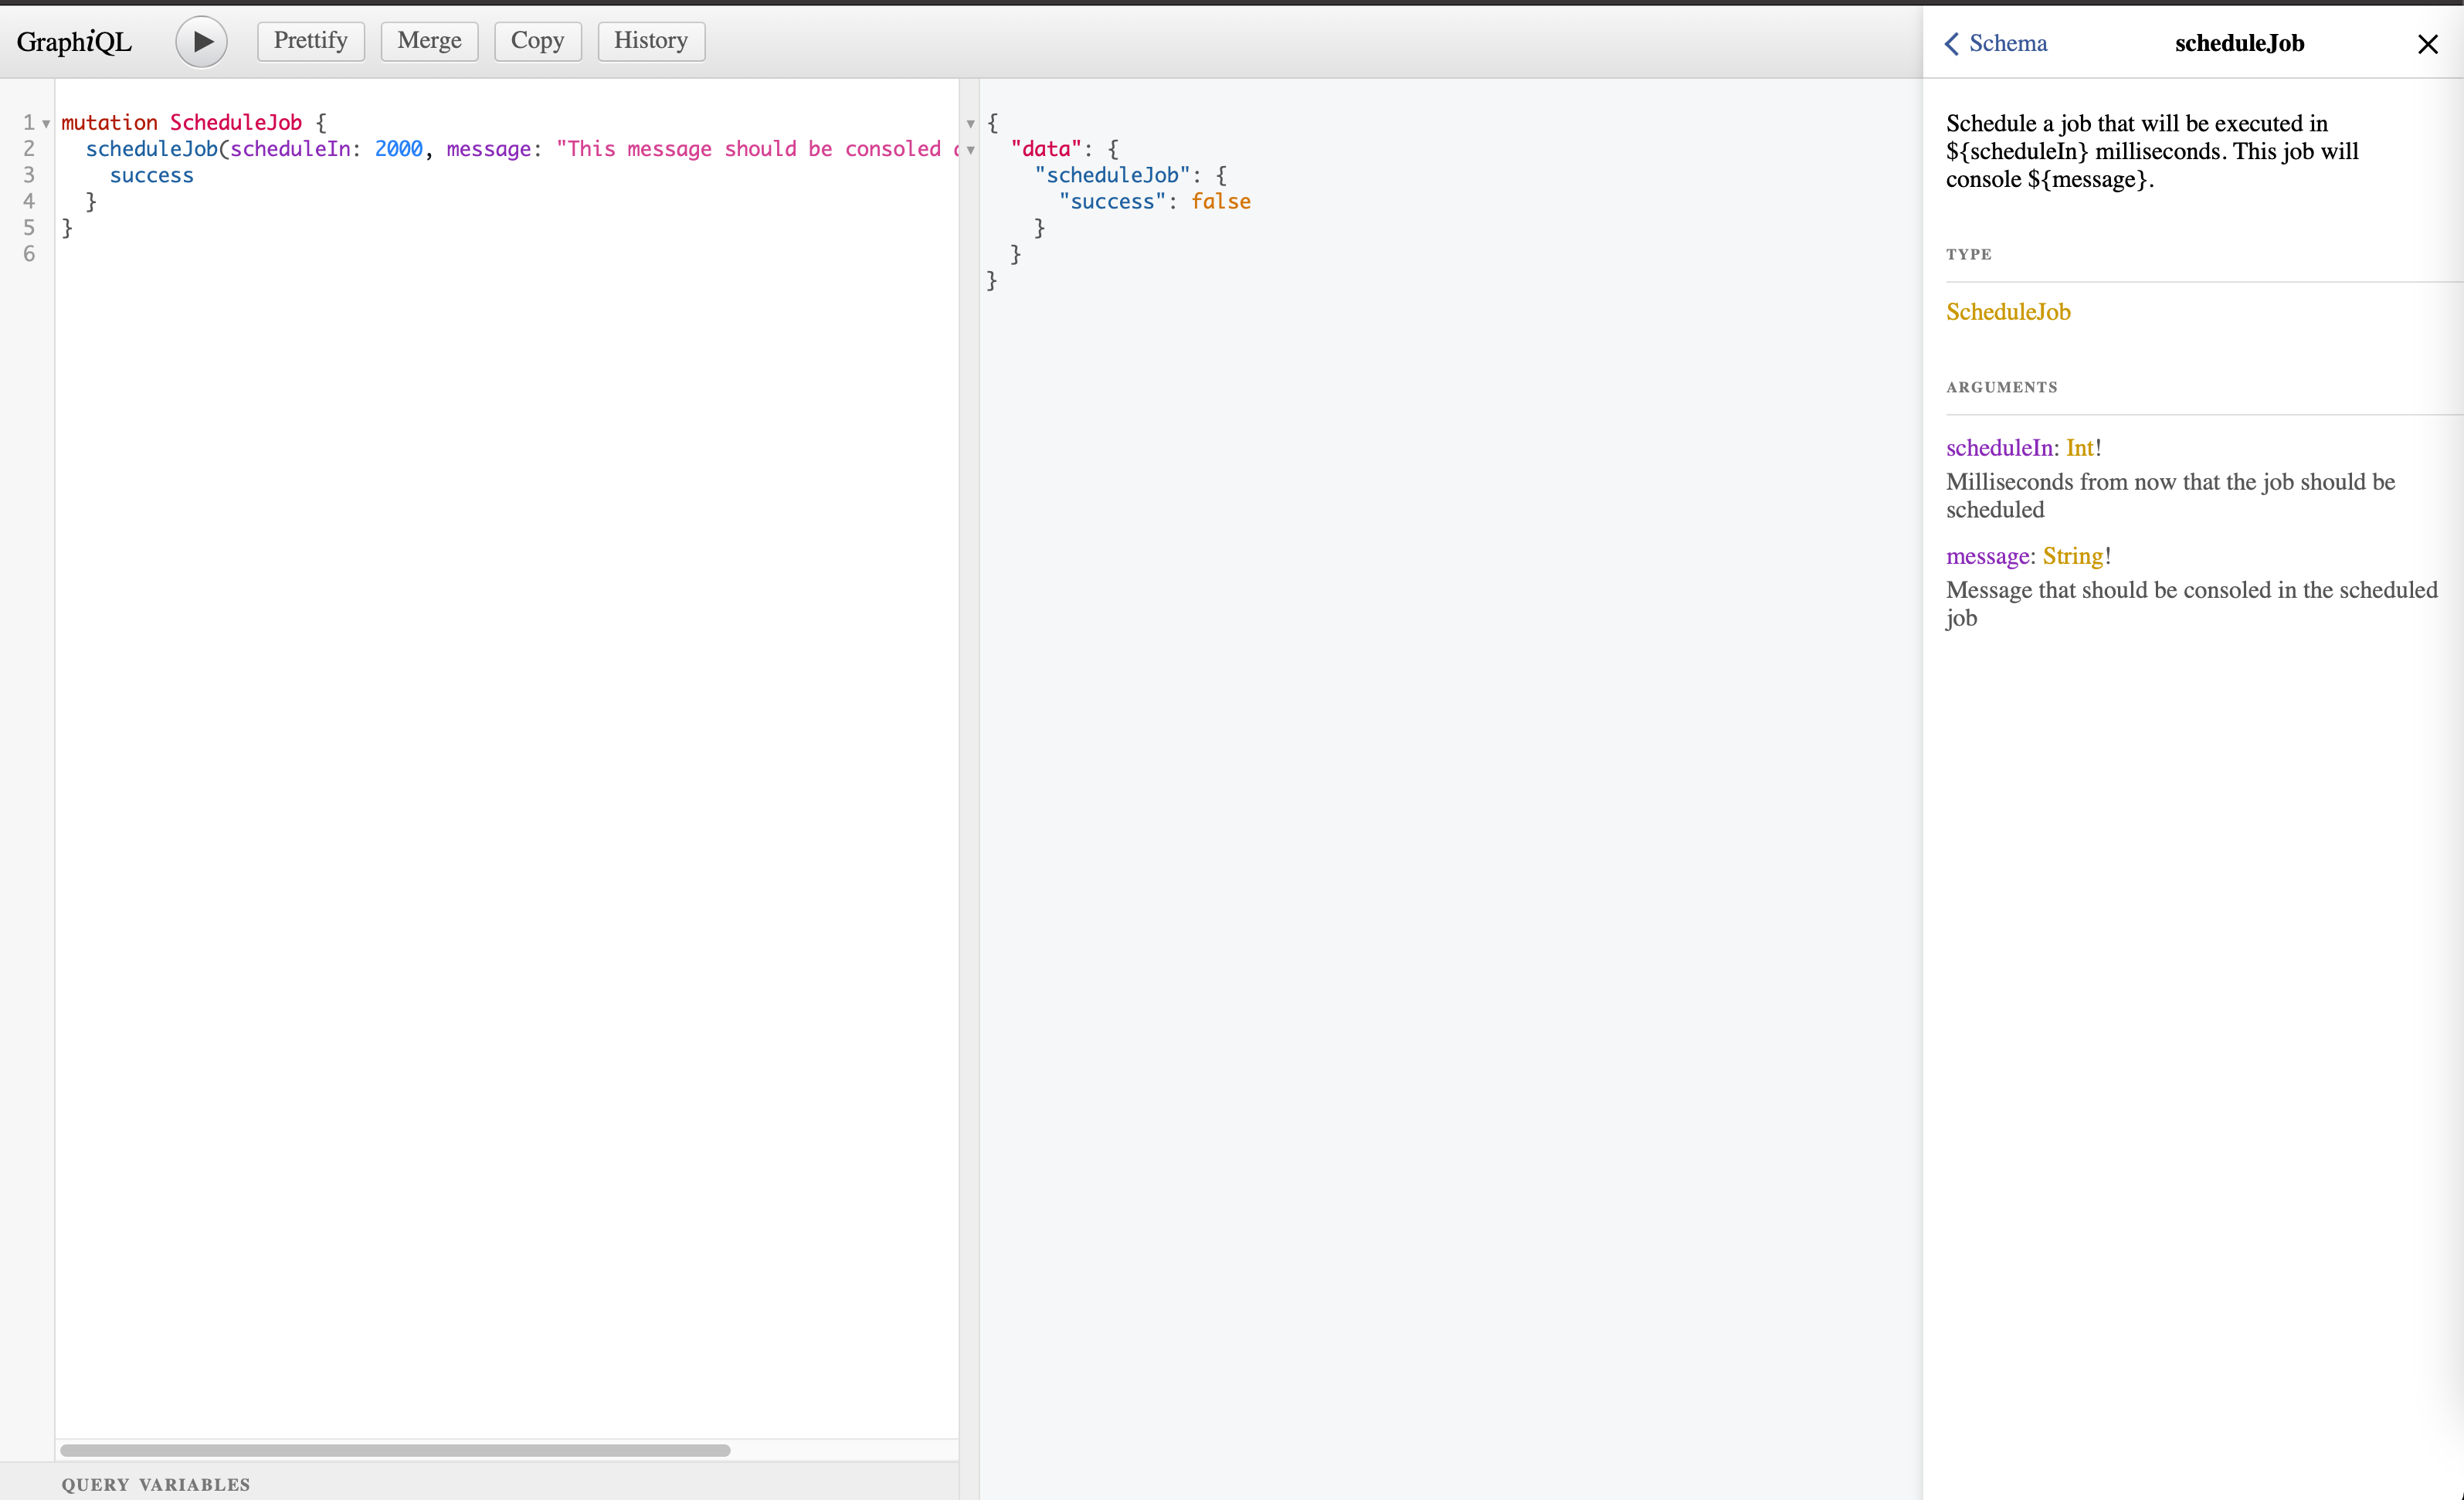
This mutation will accept two input parameters:

  • scheduleIn represents the time in milliseconds that the job is scheduled to execute in from now.
  • message represents the message to be logged when the job is executed. We will use the value of scheduleIn to delay the execution of the job added to the queue.

If the job is scheduled successfully the mutation will return { success: true } else it will return { success: false }

Step 3

Now we need to expose the mutation.

We can do this by adding the following code to the gql/mutations.js file.


import { scheduleJob } from '@gql/custom/scheduleJobMutation';
...
...
export const addMutations = () => {
  ...
  ...
  // custom mutations
  mutations.scheduleJob = scheduleJob;
  return mutations;
};

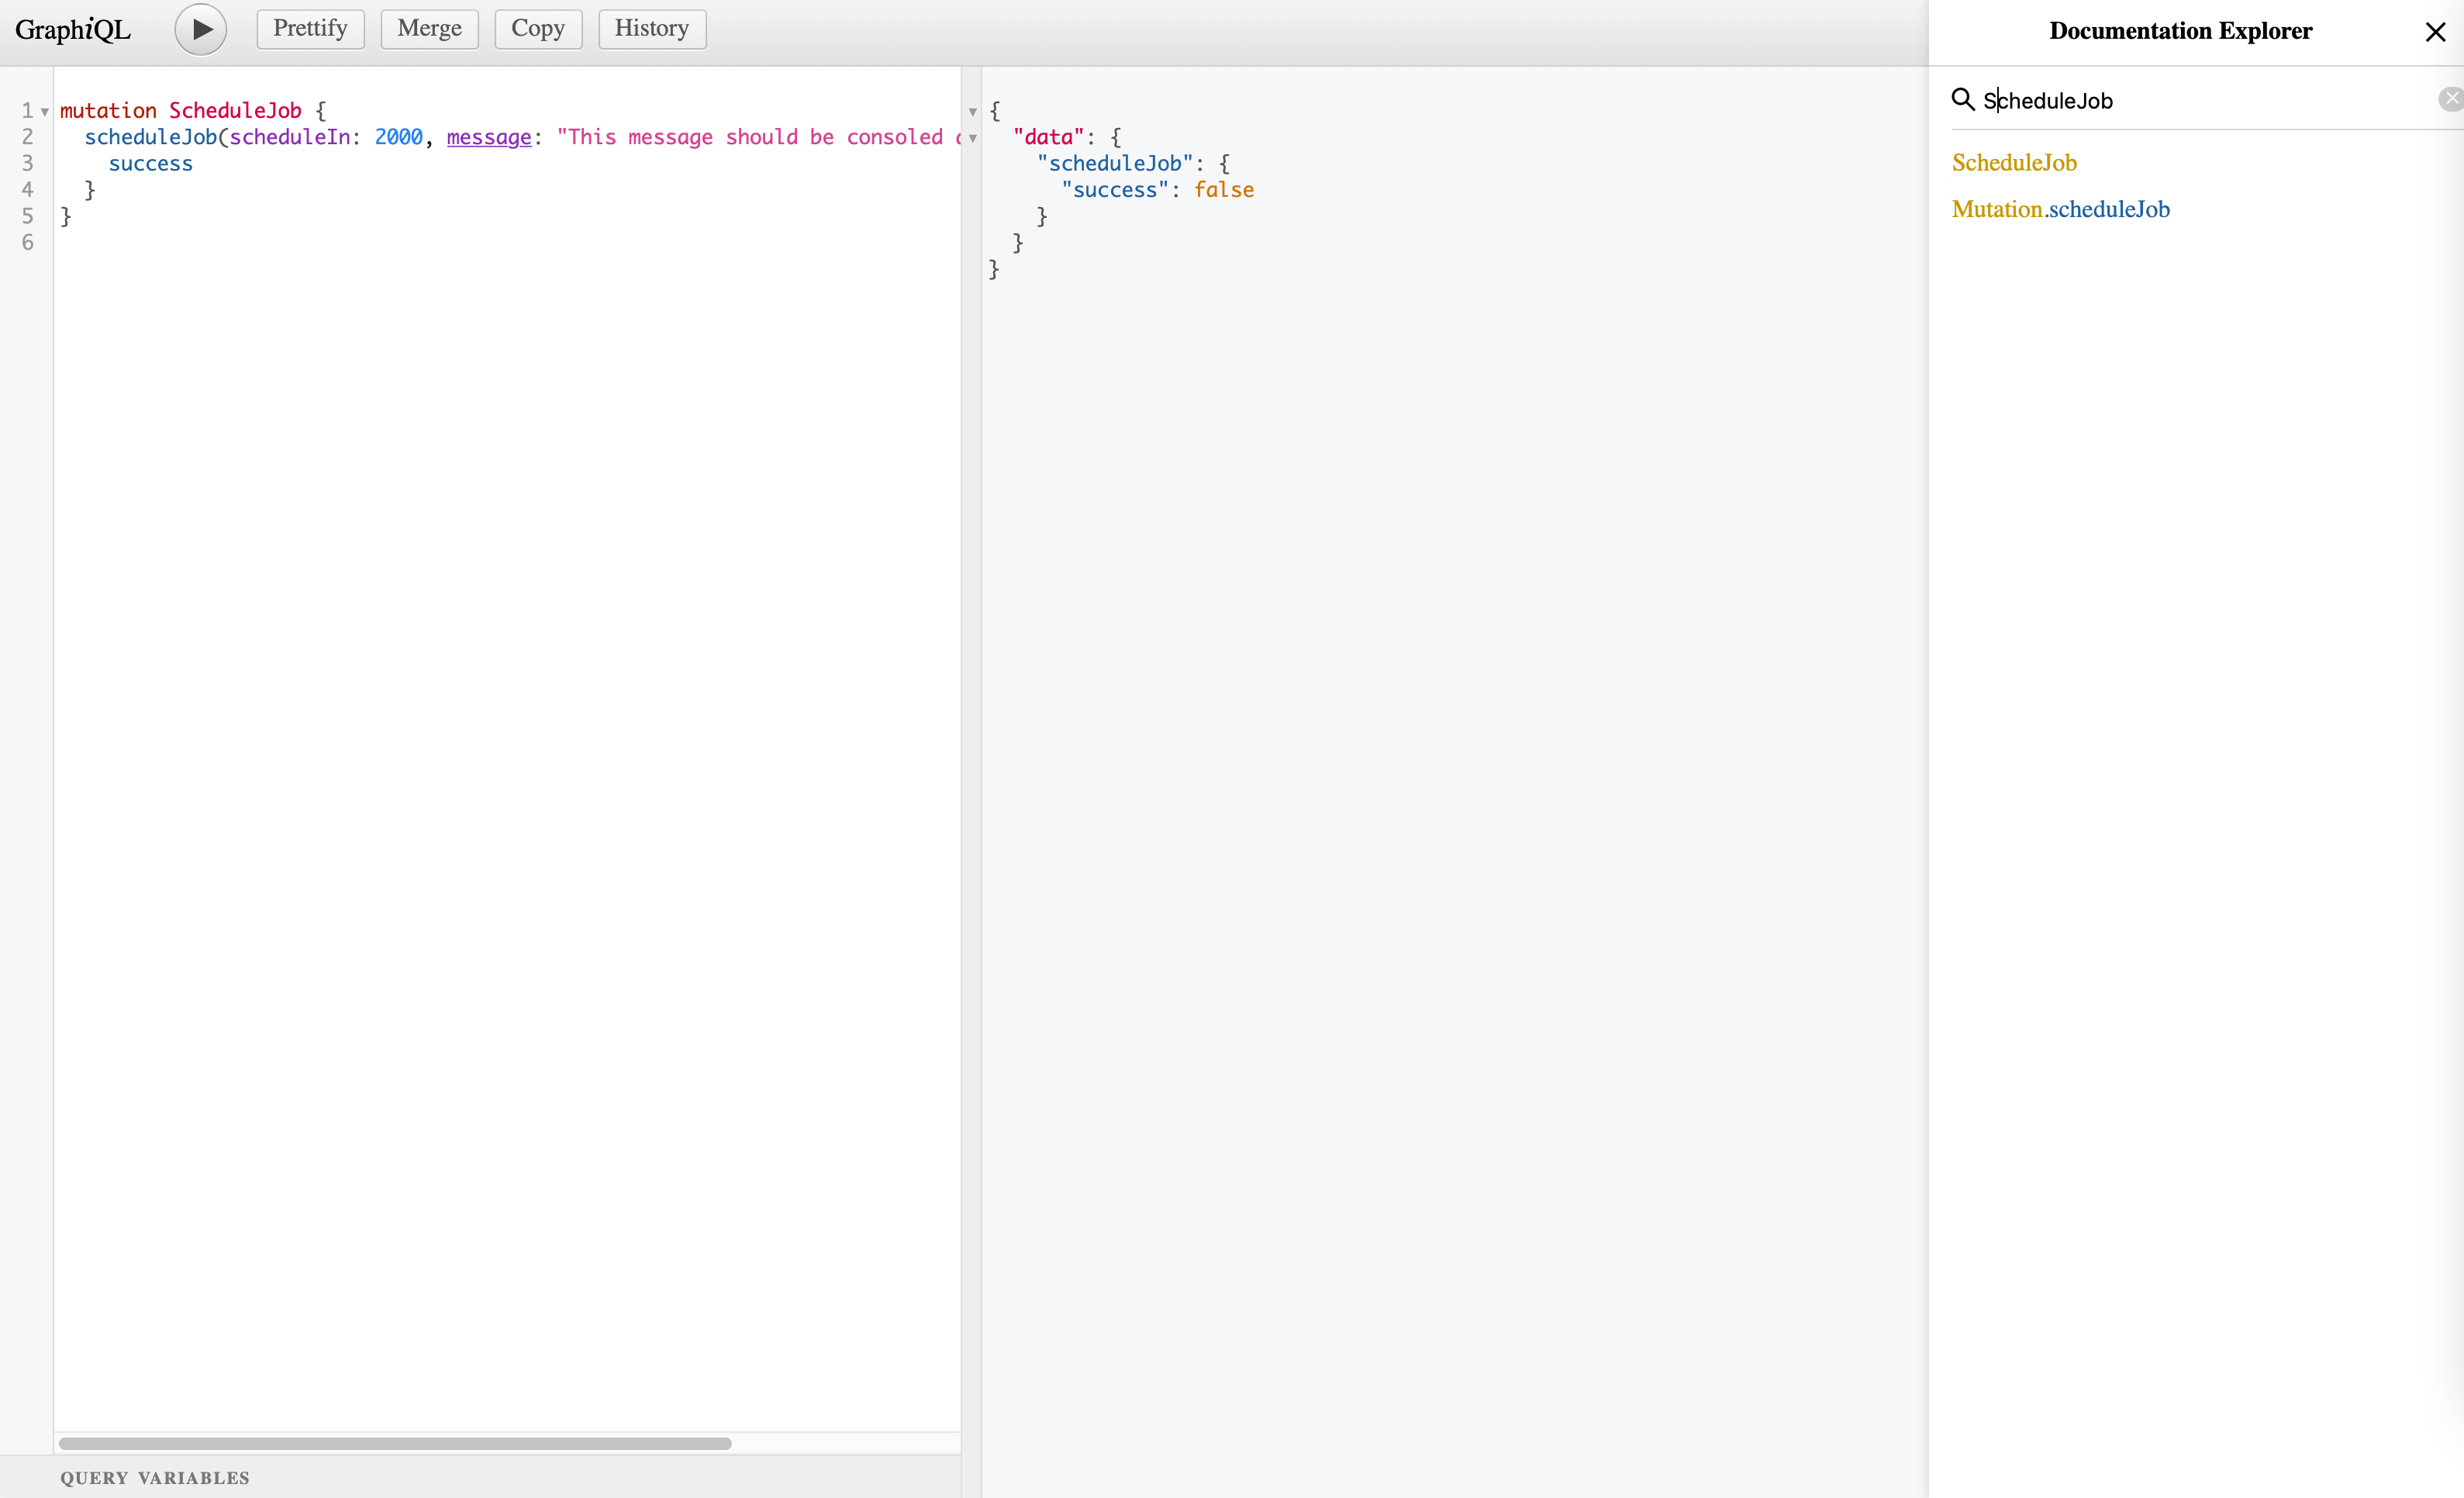
Now start the application using yarn start:local  . Go to http://localhost:9000/graphql in the browser. Click on Docs on the top right. Search for ScheduleJob

Step 4

Add the following snippet in the left pane.


mutation ScheduleJob {
  scheduleJob(scheduleIn: 2000, message: "This message should be consoled at the scheduled time") {
    success
  }
}

Hit Play on the top left. You can also hit CMD + Enter to execute the request.

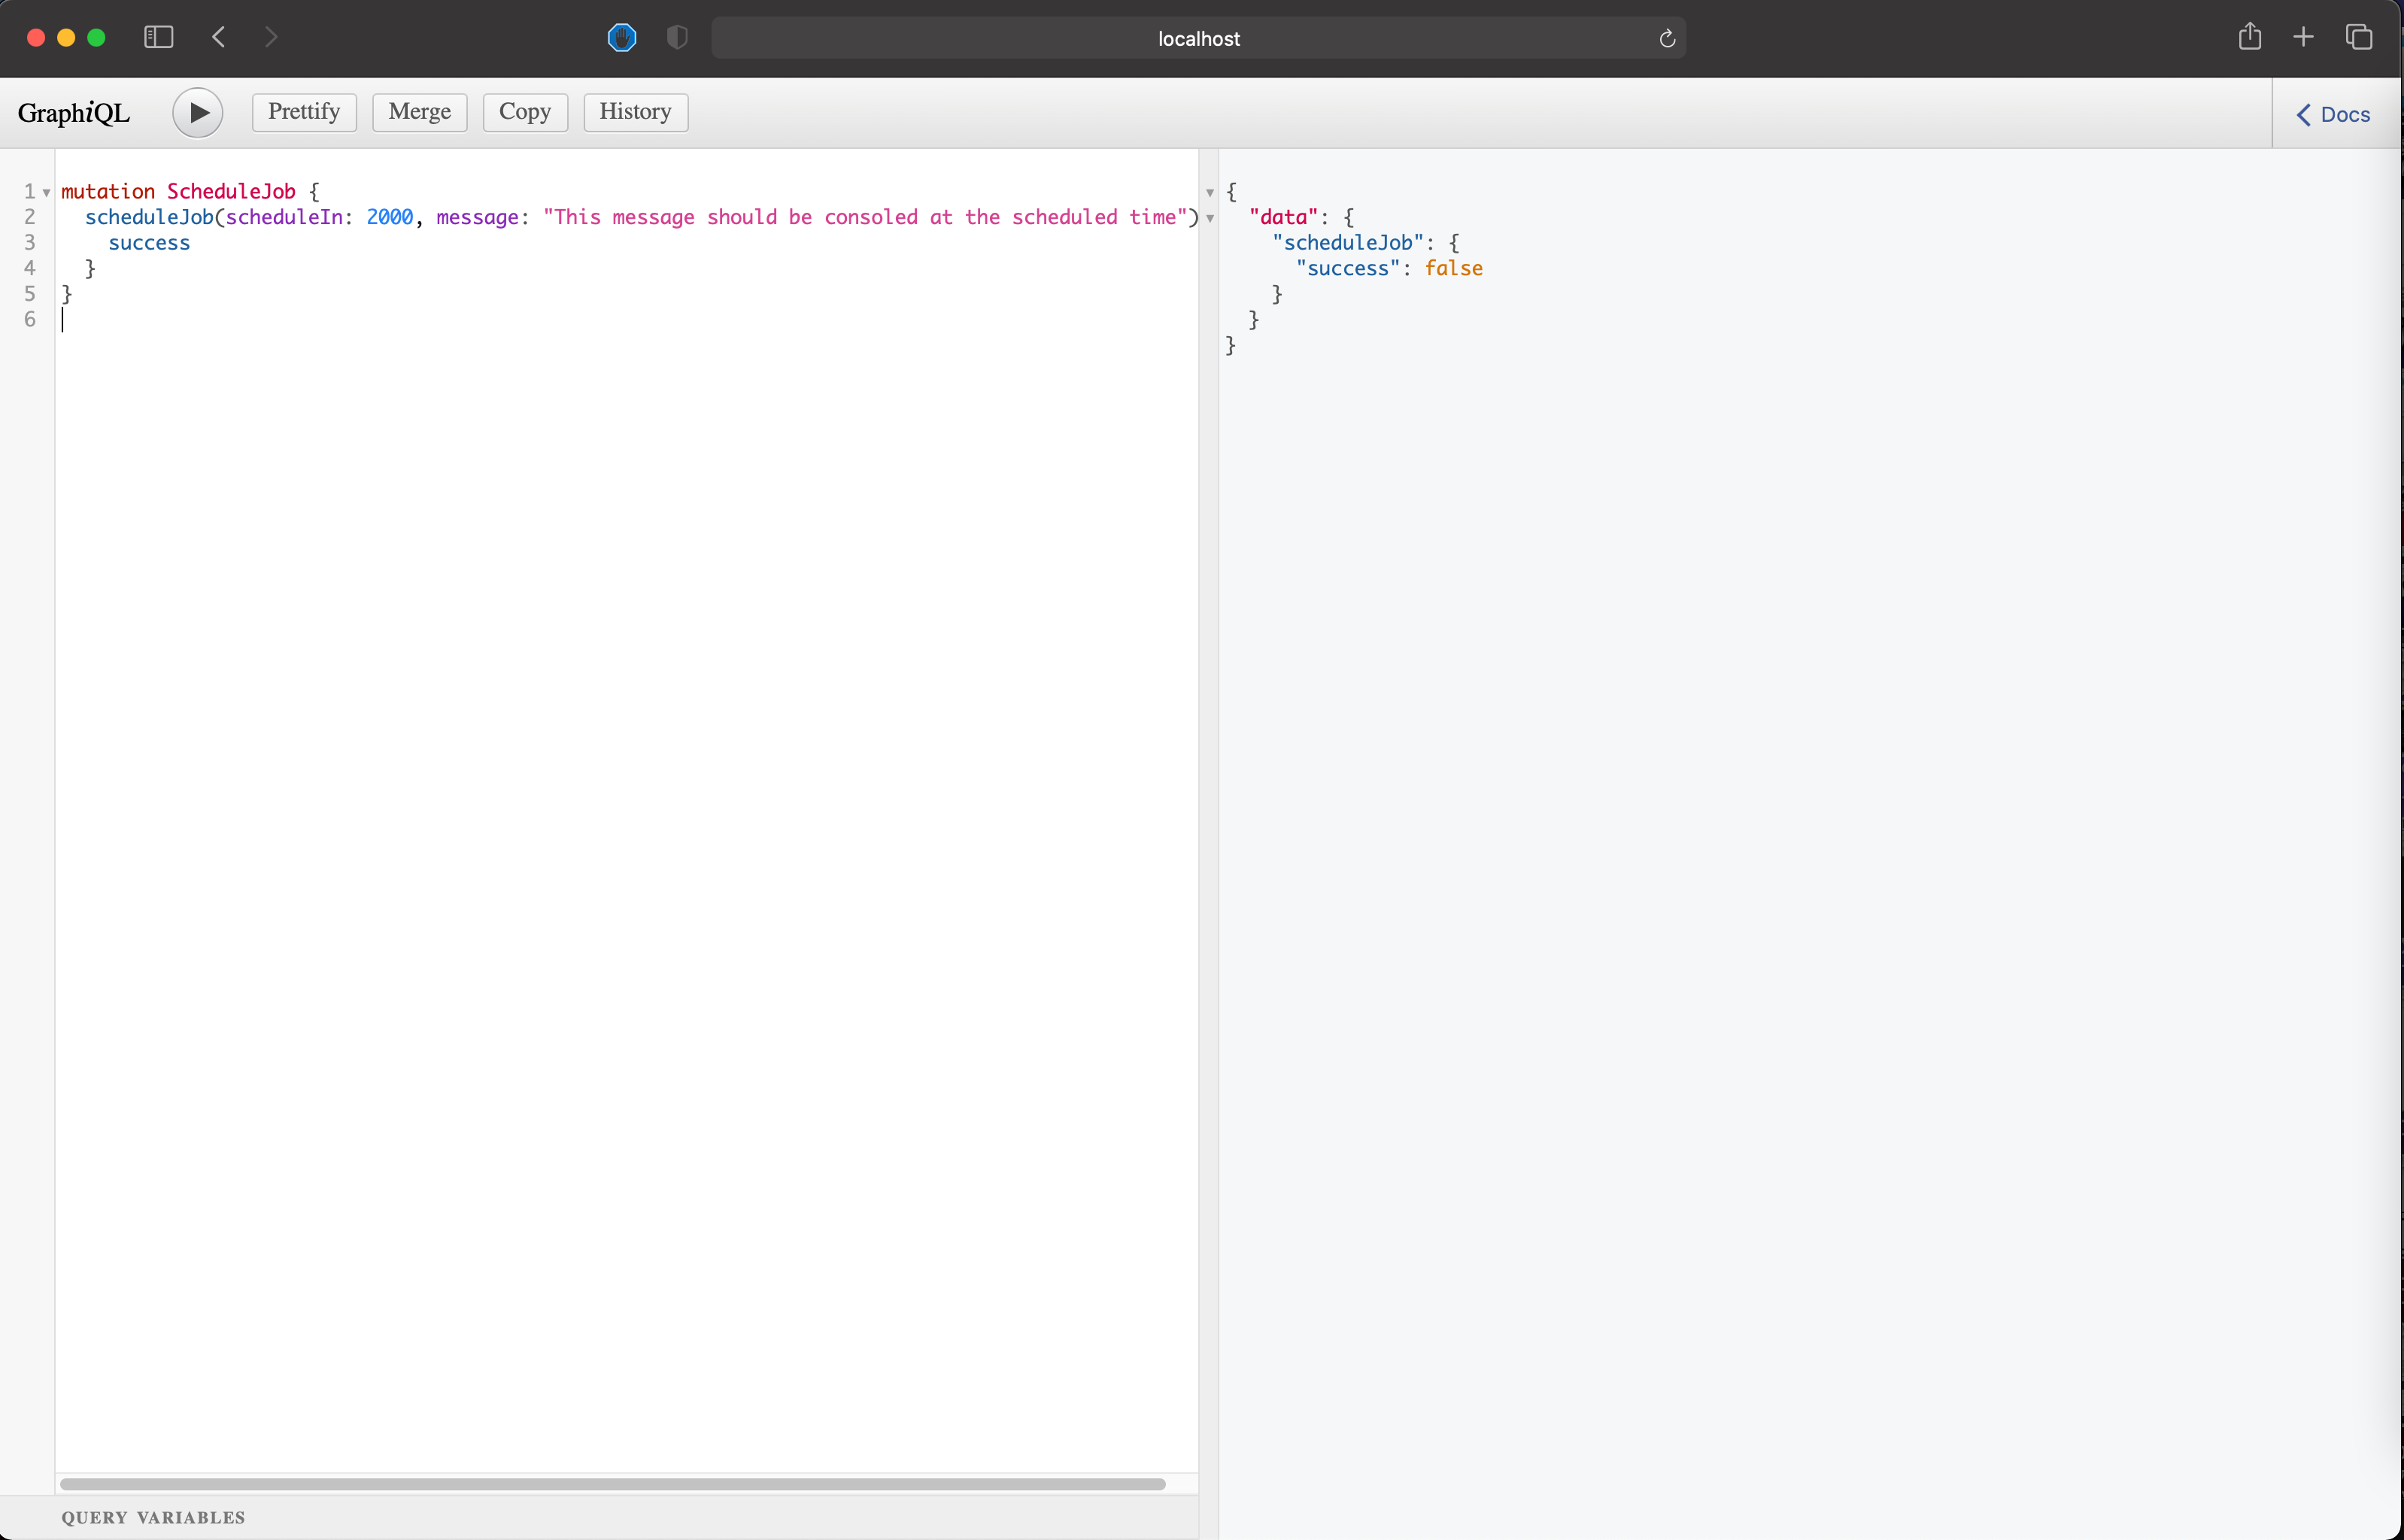
The API will respond with { success: false } since we haven't added the logic for scheduling the job. We'll get to that in a bit


{
  "data": {
    "scheduleJob": {
      "success": false
    }
  }
}

Step 5

Now we will add the logic to schedule the job when the mutation is invoked.

Paste the snippet below in the resolve function.


import moment from 'moment';
import { getQueue, QUEUE_NAMES } from '@utils/queue';
...
...

async resolve(source, args, context, info) {
    // 1
    return getQueue(QUEUE_NAMES.SCHEDULE_JOB)
      .add({ message: args.message }, { delay: args.scheduleIn })
      .then(job => {
        // 2
        console.log(`${moment()}::Job with id: ${job.id} scheduled in ${args.scheduleIn} milliseconds`);
        return { success: true };
      })
      .catch(err => {
        console.log(err);
        return { success: false };
      });
  },

  1. We get the queue by its name
  2. we return { success: true } if there are no errors while scheduling. Else we return { success: false }

Yay! You’ve created a mutation that schedules jobs to be executed after a set amount of time. Now test out your newly created scheduler by changing the value of scheduleIn and message.

Commit your code using the following git commands


git add .
git commit -m 'Add mutation to schedule Job'

Where to go from here

You now can schedule jobs so that they are executed in a specific amount of time!

I hope you enjoyed reading this article as much as I enjoyed writing it. If this piqued your interest stay tuned for the next article in the series where I will take you through how to schedule a CRON job that executes at midnight every day in a multi-container environment.

If you have any questions or comments, please join the forum discussion on twitter.

Wednesday is a boutique consultancy based in India & Singapore.

Let's talk

Wednesday is a boutique consultancy based in India & Singapore.

Let’s talk

2023